プロジェクトの準備
Visual Studioから新しいプロジェクトで「C#」「Windows」経由で「WPFアプリケーション」を選び、プロジェクト名は「UsernameTest」にして、ソリューションを作成してください。これでソリューションも UsernameTest になります。説明通りに動かないことを避けるため、この記事に関しては可能な限りソリューション名を UsernameTest にしてください。
フレームワークは「.NET 9.0」を使用します。
この「WPF における CommunityToolkit.Mvvm 覚え書き」シリーズは、ある程度のMVVM知識を有していることを前提としております!
簡単に言うとViewは見た目、ViewModelはViewにデータバインディグする関連の処理、Modelはアプリケーションのコアとなる処理群ですね。大規模プロジェクトなら、おそらくModelが一番大きくなります。
MVVM Toolkit の利用準備
ソリューションに対し、Visual Studioのメニュー「ツール」「NuGetパッケージマネージャ」から「ソリューションのNuGetパッケージの管理」を選び、「参照」タブから CommunityToolkit.Mvvm をインストールします。 Microsoft.Extensions.DependencyInjection も同様にインストールします。
もちろん理解している方なら、コマンドからInstall-Package CommunityToolkit.Mvvm等としても構いません。
Ioc - 制御の逆転って?
DI(依存性注入)については、簡単に言うと、オブジェクトの生成や依存関係の解決を外部(具体的には後に出てくる App.xaml.cs)に委譲することで、コードの柔軟性とテストの容易さを向上させるパターンです。この記事では、具体的な手順を通じてDIの使い方を学びます。
何より大切なのは、自分でソリューションを作り、手を動かすことです。コピペしても何も習得できず、応用が利きません。
App.xaml の書き換え
まずは MVVM としてのスタンダードとして、プロジェクト直下に [追加] から [新しいフォルダ] を利用して Views 、ViewModels そして Models フォルダを作ります、(今回は Models 使わないので省いていいですけど、一般的な構成として覚えておいてください、すなわち大規模アプリケーション開発に直接アドバイスする記事ではありません)。
プロジェクト直下にある MainWindow.xaml を Views にドラッグドロップで移動します。移動時、名前空間も調整してください。
そして App.xaml を以下のように調整してください。
<Application x:Class="UsernameTest.App"
             xmlns="http://schemas.microsoft.com/winfx/2006/xaml/presentation"
             xmlns:x="http://schemas.microsoft.com/winfx/2006/xaml"
             xmlns:local="clr-namespace:UsernameTest"
             StartupUri="MainWindow.xaml">
    <Application.Resources>

    </Application.Resources>
</Application>
から
<Application
    x:Class="UsernameTest.App"
    xmlns="http://schemas.microsoft.com/winfx/2006/xaml/presentation"
    xmlns:x="http://schemas.microsoft.com/winfx/2006/xaml"
    xmlns:local="clr-namespace:UsernameTest"
    StartupUri="Views/MainWindow.xaml">
    <Application.Resources />
</Application>
と変更します。StartupUri の行に Views フォルダを追加するだけです。
ここで、ソリューションを実行して「MainWindow」が開かれることを確認してください。
依存性注入の設定
Views\App.xaml 直下にある App.xaml.cs の App クラスを以下のように置き換えます。
とりあえずは、何も考えずにこうすればでしょう、一度設定さえすれば基本弄りません。DIで扱うクラスの追加は ConfigureServices になり、ここだけは弄ります。
    /// <summary>
    /// Interaction logic for App.xaml
    /// </summary>
    public partial class App : Application
    {
        /// <summary>
        /// サービスの登録
        /// </summary>
        public App()
        {
            Services = ConfigureServices();
            Ioc.Default.ConfigureServices(Services);
        }

        /// <summary>
        /// 現在の App インスタンスを使うために取得する
        /// </summary>
        public new static App Current => (App)Application.Current;

        /// <summary>
        /// サービスプロバイダ
        /// </summary>
        public IServiceProvider Services { get; }

        /// <summary>
        /// サービスをここで登録する
        /// </summary>
        /// <returns></returns>
        private static ServiceProvider ConfigureServices()
        {
            var services = new ServiceCollection();

            // ViewModel
            services.AddSingleton<IMainWindowViewModel, MainWindowViewModel>();
            return services.BuildServiceProvider();
        }
    }
これで必要なディレクティブ
using CommunityToolkit.Mvvm.DependencyInjection;
using Microsoft.Extensions.DependencyInjection;
が自動的に追加されるはずです。
ここでは、AddSingletonの行にある IMainWindowViewModel MainWindowViewModel のためコンパイルできません!焦らないで!
で「依存性注入とはなんぞや?」という話になりますが、具体的には ConfigureService 内でクラスのインスタンスを一括生成し、クラスを利用する際にはインターフェース IMainWindowViewModel を使って「クラスのコンストラクタ引数を使ってインスタンスを渡す(注入する)」という仕組みです。
MainWindowViewModel.cs の作成
次に、プロジェクトの ViewModels フォルダに MainWindowViewModel.cs を「クラス」として作ります。名前の通り MainWindow の ViewModelとなります。
その内容を、全部消してから、以下の内容に置き換えてください。
using System.Windows;
using CommunityToolkit.Mvvm.ComponentModel;

namespace UsernameTest.ViewModels
{
    public interface IMainWindowViewModel;

    public class MainWindowViewModel : ObservableObject, IMainWindowViewModel
    {
        private string _username = string.Empty;
        public string Username
        {
            get => _username;
            set => SetProperty(ref _username, value);
        }
    }
}
ソリューション名を UsernameTest にしていない場合、namespace の後の UsernameTest を書き換えることはわかりますよね?
それすらわからないなら、ソリューションを UsernameTest で作り直してやり直しましょう。ソリューションの作り直しすら分からないなら、それ以前の問題なので、この記事を読む以前から出直してきましょう
SetProperty は ObservableObject を利用したデータバインディングを簡単に実行する方法です。
「データバインティングしないとデータ壊れる可能性がある、だからデータバインディングしてデータ壊さないようにしてる」という言い回しで大丈夫でしょうか?
ある程度以上の規模の開発ならデータバインディングは必須になるので、覚えておきましょう。
ViewModelの登録
先ほど、AddSingletonの行にある IMainWindowViewModel MainWindowViewModel のためコンパイルできません!と書きましたが、先ほどの追記によってコンパイルの準備が整いました。
App.xaml.cs を開き、必要なディレクティブ
using UsernameTest.ViewModels;
を追記しましょう。これでコンパイルだけは通るようになります。
DIを利用したViewModelとViewのデータバインディング設定
ここで、ViewModelには Username というバインディング可能な値があります。それを紐付けます。
まず Views フォルダにある MainWindow.xaml の中にある MainWindow.xaml.cs を開き、以下のように置き換えます。
using System.Windows;
using CommunityToolkit.Mvvm.DependencyInjection;
using UsernameTest.ViewModels;

namespace UsernameTest
{
    /// <summary>
    /// Interaction logic for MainWindow.xaml
    /// </summary>
    public partial class MainWindow : Window
    {
        public MainWindow()
        {
            InitializeComponent();
            DataContext = Ioc.Default.GetService<IMainWindowViewModel>();
        }
    }
}
これで、MainMainWindowViewModel.cs にある Username と XAML のデータバインディングの準備が整いました。
Views\MainWindow.xaml を開いて、以下のようにしましょう。
<Window
    x:Class="UsernameTest.MainWindow"
    xmlns="http://schemas.microsoft.com/winfx/2006/xaml/presentation"
    xmlns:x="http://schemas.microsoft.com/winfx/2006/xaml"
    xmlns:d="http://schemas.microsoft.com/expression/blend/2008"
    xmlns:local="clr-namespace:UsernameTest"
    xmlns:mc="http://schemas.openxmlformats.org/markup-compatibility/2006"
    Title="MainWindow"
    Width="800"
    Height="450"
    mc:Ignorable="d">
    <Grid VerticalAlignment="Center">
        <Grid.RowDefinitions>
            <RowDefinition Height="Auto" />
            <RowDefinition Height="Auto" />
        </Grid.RowDefinitions>
        <TextBox
            Grid.Row="0"
            Width="300"
            Height="30"
            Text="{Binding Username, UpdateSourceTrigger=PropertyChanged}" />
        <Button
            Grid.Row="1"
            Width="60"
            Height="30"
            Command="{Binding UsernameCommand}"
            Content="名前表示" />
    </Grid>
</Window>
これを実行すれば、_username にデータバインディングできています。
Binding Username にある UpdateSourceTrigger は、今回のように Username が変更される度に _username を更新する必要がある場合に記述してください。
_username にデータバインディングされているかの確認
そして、UsernameTest.ViewModels.MainWindowViewModel.cs の MainWindowViewModel クラス内に以下の記述をしてください。
public RelayCommand UsernameCommand { get; set; }

public MainWindowViewModel()
{
    UsernameCommand = new RelayCommand(
        () => MessageBox.Show(_username)
    );
}
ここで、RelayCommand を利用するために必要なディレクティブが追記されます
using CommunityToolkit.Mvvm.Input;
これで、このソリューションは最低限コンパイルして実行できます。
実行したら、メッセージボックスで Username が _username にバインディングされていることが確認できましたよね?
確認できなかったら、どこかで手順を間違えているので見直すか、一から作り直しましょう。
ここで問題なのは、Username が空欄でもボタンが押せることなので、どうにかしましょう。
private string _username = string.Empty;
public string Username
{
    get => _username;
    set => SetProperty(ref _username, value);
}
という行がありますよね、ここを改変します。
private string _username = string.Empty;
public string Username
{
    get => _username;
    set
    {
        SetProperty(ref _username, value);
        UsernameCommand.NotifyCanExecuteChanged();
    }
}
これで、Username TextBox の変更に対し、ボタンの Command にイベント発火するようになります。
NotifyCanExecuteChanged であることに注意!
更に UsernameCommand を書き換えます。
public RelayCommand UsernameCommand { get; set; }

public MainWindowViewModel()
{
    UsernameCommand = new RelayCommand(
        () => MessageBox.Show(_username)
    );
}
から
public RelayCommand UsernameCommand { get; set; }

public MainWindowViewModel()
{
    UsernameCommand = new RelayCommand(
        () => MessageBox.Show(_username),
        () => !string.IsNullOrEmpty(_username)
    );
}
と、有効無効の条件を入れます。
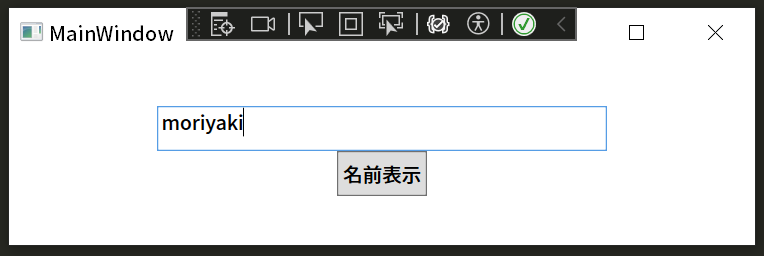
こうすることで、Username が空欄の時に「名前表示」が無効になり、名前を入力したら「名前表示」が有効になります。
ここまでで、依存性注入を利用しての、データバインディングができました。
現時点での画面
この時点でのソリューションエクスプローラーは、こうなっているはずです。

ソリューションを動かしたら、こうなるはずです。

また、名前を入力したら、こうなるはずです。

こうなっていれば、あなたはきちんと手順を踏んで作業をやり遂げたことになります。お疲れ様でした。
最後に
本記事の作成にあたり、一部ChatGPTの添削アドバイスを参考にしました。
次記事は 「WPF における CommunityToolkit.Mvvm(MVVM ToolKit) 覚え書き(2) 依存性注入(DI)を利用した簡単なサンプル」となります。
※ _name を _username とするべき所、Name を Username とするべき所を修正し損ねていたことを伏してお詫び申し上げます。